
What is a Cable Railing System?
A cable railing system is a safety barrier that uses tensioned cables instead of traditional balusters. It’s widely appreciated for its sleek design, unobstructed views, and durability.
ARTICLES
12/20/20242 min read
These systems are commonly used in outdoor and indoor spaces, providing a contemporary aesthetic while ensuring safety.
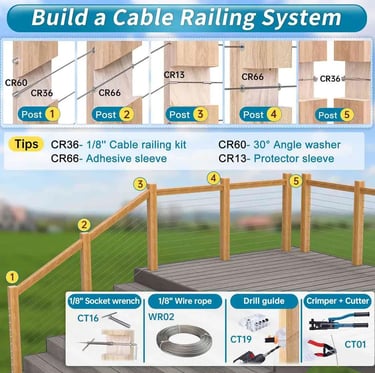
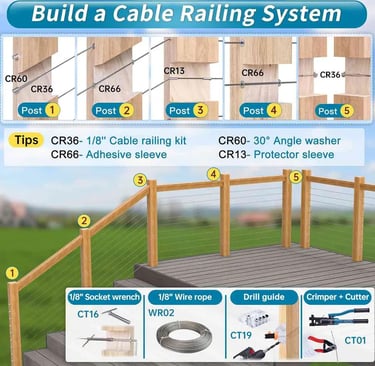
Components of the Cable Railing System
1. Posts: The structural supports that hold the cables in place. These can be made from wood, metal, or composite materials.
Post Types:
• Post 1: Entry or starting post.
• Post 2 & 3: Intermediate posts for maintaining tension.
• Post 4 & 5: Corner or termination posts with specific adapters.
2. Cables:
• 1/8” Wire Rope (WR02): The standard size for most railing systems, offering strength and a clean look.
• CR36 - 1/8” Cable Railing Kit: Includes all necessary hardware, such as tensioners and connectors.
3. Support Accessories:
• CR66 Adhesive Sleeve: Used to secure the cable into posts, ensuring a tight fit.
• CR60 Angle Washer: Allows cables to pass through angled or sloped posts.
• CR13 Protector Sleeve: Prevents cable wear and keeps the post looking neat.
4. Tools Needed:
• CT16 - 1/8” Socket Wrench: Tightens bolts and tensioners.
• CT19 Drill Guide: Ensures holes are drilled at the correct angle and alignment.
• CT01 Crimper + Cutter: Used to cut and secure cables to their fittings.
Steps to Build a Cable Railing System
1. Plan the Layout:
• Measure the area where the railing will be installed.
• Determine the number of posts and the spacing between them (usually 3–4 feet apart for stability).
2. Install the Posts:
• Securely mount posts to the deck or staircase. Use concrete footings or bolts depending on the surface.
• Ensure posts are perfectly vertical using a level.
3. Drill Holes for the Cables:
• Use the CT19 Drill Guide to drill straight holes through the posts.
• For corner posts, angle washers or protectors may be required.
4. Thread the Cables:
• Begin threading the 1/8” wire rope through the posts, starting from one end.
• Use CR66 adhesive sleeves and CR13 protectors as necessary.
5. Tension the Cables:
• Attach the tensioning hardware from the CR36 Kit.
• Tighten the cables using the CT16 Socket Wrench. Ensure all cables are uniformly tensioned for a clean, straight appearance.
6. Trim and Secure the Ends:
• Use the CT01 Crimper and Cutter to cut excess cable and crimp the ends securely.
Why Choose a Cable Railing System?
1. Aesthetic Appeal: Its minimalistic and modern design enhances the overall look of any space.
2. Durability: Made from high-quality stainless steel, these systems resist rust and weather damage.
3. Unobstructed Views: Ideal for locations with scenic landscapes or limited space.
4. Customizable: Adapts to different angles and layouts, making it versatile for any deck or staircase.
Conclusion
A cable railing system is an excellent choice for those looking to add a modern, safe, and functional touch to their outdoor or indoor spaces. With the right tools and materials, you can create a railing system that is not only visually appealing but also long-lasting and low-maintenance.
Contact us today to discuss your project and get professional installation services. Let us bring your vision to life!