Step-by-Step Guide to Building a Wooden Deck: Essentials and Installation Process
Wooden decks are a popular and practical solution for creating a cozy outdoor space.
ARTICLES
12/18/20242 min read


Introduction
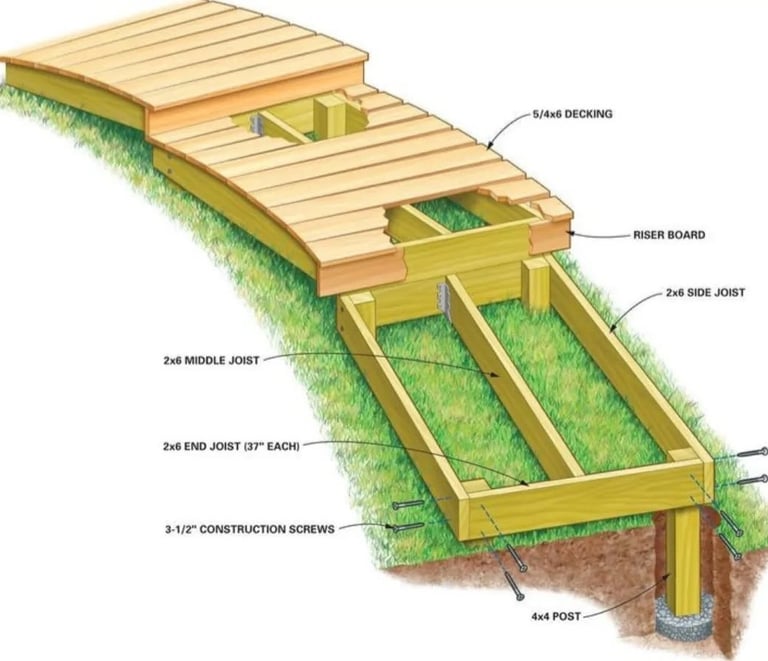
Wooden decks are a popular and practical solution for creating a cozy outdoor space. They are ideal for gardens, backyards, or terraces. Today, we will explore the construction process of a sturdy wooden deck, using high-quality materials such as redwood and reliable fasteners. The diagram below visually illustrates the main stages and elements of the deck construction.
Materials for the Project
1. Deck Boards: 5/4x6 (decking) – used for the final surface covering.
2. Riser Board: Adds a finished look to the steps and edges.
3. Joists and Beams:
• Side Joists: 2x6 SIDE JOIST
• Middle Joists: 2x6 MIDDLE JOIST
• End Joists: 2x6 END JOIST (37” each)
4. Support Posts: 4x4 POST – for securing the deck to the foundation.
5. Fasteners:
• Construction Screws: 3 1/2” construction screws
6. Additional Items:
• Metal connectors for joists and beams (if required).
• Gravel or concrete for securing the posts.
Steps to Build a Wooden Deck
1. Preparation and Site Layout
• Clear the area of grass, debris, and obstructions.
• Mark the future deck location using stakes and string.
• Identify positions for the support posts (4x4 POST) — they must be evenly spaced to ensure equal load distribution.
2. Installing the Support Posts
• Dig holes for the posts approximately 12–18 inches deep.
• Add gravel to the bottom of each hole for drainage and place the posts.
• Secure the posts with concrete mix or compacted soil.
• Use a level to ensure the posts are perfectly vertical.
3. Constructing the Deck Frame
• Attach the end joists (2x6 END JOIST) between the posts using construction screws.
• Install the side joists (2x6 SIDE JOIST) to form a rectangular frame.
• Add the middle joists (2x6 MIDDLE JOIST) for deck support. The spacing between joists should typically be 16 inches for structural stability.
• Use metal connectors for additional reinforcement where beams meet.
4. Laying the Deck Boards
• Begin laying the deck boards (5/4x6) from one edge of the deck.
• Leave a small gap (1/8”–1/4”) between the boards to allow for ventilation and water drainage.
• Secure the boards with construction screws, ensuring that screw heads are flush with the board surface.
• Trim any excess board edges after installation is complete.
5. Finishing Touches
• Install the riser boards to cover the sides of the deck and provide a polished appearance.
• Sand the deck surface to remove any rough spots or splinters.
• Apply a protective finish (stain, sealant, or oil) to prolong the wood’s lifespan.
Why Choose Redwood?
• Durability: Redwood is naturally resistant to decay and pests.
• Aesthetics: Its rich color and beautiful grain make redwood decks visually appealing.
• Eco-Friendly: Redwood is a renewable and sustainable natural material.
Conclusion
Building a wooden deck is an achievable project when you follow the correct construction process and use high-quality materials. This project will not only enhance the look of your outdoor space but also create a functional area for years to come.
If you are looking for professional assistance with deck installation, design, or construction, contact us today! We offer expert services for building decks, fences, and other wooden structures tailored to your needs.
Contact Information:
• Phone: 818-401-7766
• Website: www.prohandshandyman.com
