Step-by-Step Guide to Building a Deck
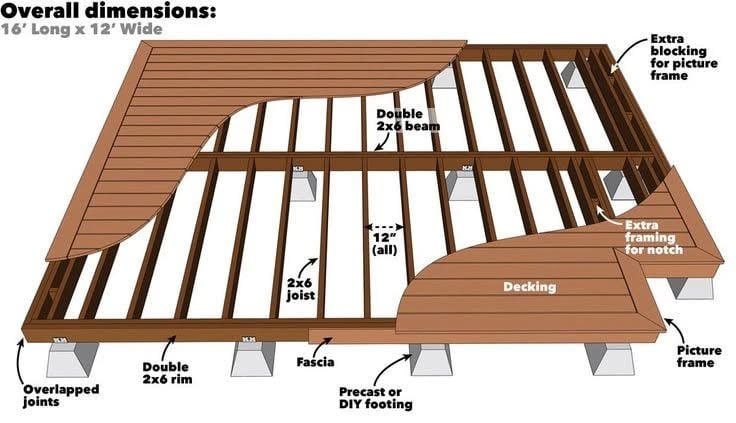
Building a deck like the one shown in the diagram is a practical and rewarding project. Here’s a detailed guide to constructing a 16’ x 12’ deck with a picture frame design, based on the layout provided:
ARTICLES
1/17/20251 min read
Step-by-Step Guide to Building a Deck
Materials Needed
1. Wood:
• 2x6 joists, beams, and rim boards.
• Decking boards (pressure-treated wood or composite).
2. Footings:
• Precast concrete or DIY concrete footings.
3. Hardware:
• Joist hangers, screws, bolts, and framing nails.
4. Additional Items:
• Blocking material for picture frame edges.
• Stain or weatherproofing finish for wood.
Step 1: Plan and Prepare
1. Design and Dimensions:
• Confirm the deck’s size: 16’ long by 12’ wide.
• Include a 12” joist spacing for strength.
2. Site Preparation:
• Mark the area and clear debris.
• Level the ground to ensure stability.
3. Check Codes:
• Verify local building codes and obtain necessary permits.
Step 2: Install Footings
1. Footing Layout:
• Space footings evenly to support the joists and beams.
• Use precast footings or pour concrete footings.
2. Install Posts:
• Attach 4x4 posts to the footings, ensuring they are plumb.
• Secure beams to the posts using brackets or bolts.
Step 3: Frame the Deck
1. Install Rim Boards:
• Attach double 2x6 rim boards around the perimeter.
2. Joists:
• Place 2x6 joists on 12” centers between the rim boards.
• Use joist hangers for secure attachment.
3. Blocking:
• Add extra blocking for the picture frame edge.
• Include additional framing for notches or openings, if required.
Step 4: Lay Decking Boards
1. Install Deck Boards:
• Start at one end and lay boards perpendicular to the joists.
• Leave a small gap between boards for water drainage.
2. Picture Frame:
• Use extra framing for the outer edge to create a clean picture frame look.
• Trim and miter edges for a polished finish.
Step 5: Finishing Touches
1. Fascia:
• Attach fascia boards along the rim to hide framing.
2. Stain or Seal:
• Apply a weatherproof finish to protect the deck.
3. Inspect:
• Check for levelness and secure fasteners.
Key Tips
• Safety: Wear protective gear and follow safety protocols.
• Materials: Opt for treated lumber or composite for durability.
• Maintenance: Clean and reseal annually to extend the deck’s life.
For assistance with building a deck or professional construction services, contact ProHands Handyman Services!
📞 +1 (818) 401-7766