
Professional Silicone Application Tips: What You Didn't Know
Applying silicone seems simple, but without the right technique, it can lead to messy, uneven lines and wasted material. Fortunately, there's a professional trick that can help you get cleaner, more precise results with less effort — modifying the nozzle tip.
ARTICLES
3/22/20252 min read
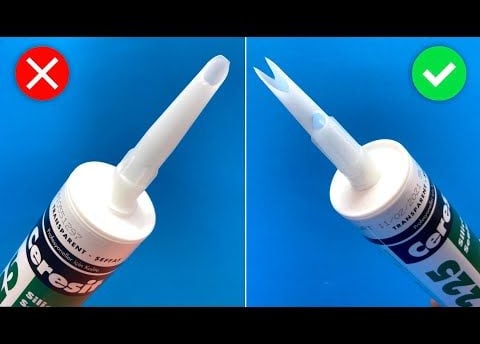
Standard Nozzle vs. V-Cut Nozzle
Take a look at the image above:
The standard cut nozzle (left) delivers a single, uncontrolled stream of silicone. It's harder to guide, and often results in excess buildup or gaps.
The V-cut nozzle (right) is shaped like a wedge or fork. This cut helps direct silicone flow in a more controlled and even way, while also slightly pressing it into the joint as you go.
Benefits of the V-Cut Silicone Nozzle
✔ Precision Control – The V-cut channels the silicone smoothly into the joint, helping you follow the seam exactly.
✔ Even Bead Distribution – The silicone spreads across the surface more uniformly, reducing lumps and air pockets.
✔ Cleaner Edges – Less cleanup is required afterward because the bead sits neatly within the desired area.
✔ Less Wastage – You use only as much silicone as needed, saving on materials over time.
✔ Improved Adhesion – The slight pressure from the forked tips helps the silicone press into the surfaces, improving bond strength and waterproofing.
How to Make the Perfect V-Cut Nozzle
Start with a clean silicone tube and a standard nozzle.
Using a utility knife or sharp scissors, cut the nozzle at a 45° angle.
Carefully cut a small triangle out of the center tip of the nozzle to create the V-shape.
Smooth out any jagged edges to ensure even application.
Reattach the nozzle, load the tube into your caulking gun, and test on scrap material before applying to your project.
Best Situations to Use the V-Cut Nozzle
Sealing bathtubs, sinks, and showers where smooth curves and tight corners are common.
Caulking backsplashes and countertops for a neat, professional edge.
Window and door frames where a clean bead is visible.
Exterior siding or gaps that require precision and flexibility.
Additional Silicone Application Tips
Surface Prep: Make sure surfaces are dry, clean, and free of dust or grease.
Masking Tape: Use painter’s tape along both edges of the seam for a razor-sharp finish. Remove tape immediately after smoothing.
Smoothing: Use a damp finger, plastic tool, or silicone finishing tool to smooth the bead within 5 minutes of application.
Cure Time: Allow proper curing based on product instructions — usually 24 hours — before exposing the surface to moisture.
We Offer Professional Sealing and Caulking Services
From kitchens and bathrooms to outdoor trim, we ensure perfect silicone application — every time. If you want clean lines, strong seals, and no mess, we’ve got you covered.
📞 Call or text: 818-401-7766
📍 Serving: Glendale, Burbank, Pasadena, Los Angeles, Studio City, North Hollywood, Sherman Oaks, Eagle Rock, Highland Park, Silver Lake, and surrounding areas.
Let ProHands Handyman bring a professional finish to your sealing and caulking needs. Contact us for a free estimate today!

