
Modern Wooden Privacy Screen Installation Guide
This beautifully crafted privacy screen features wooden slats arranged in a sturdy wooden frame, offering both functionality and aesthetic appeal.
ARTICLES
12/16/20242 min read
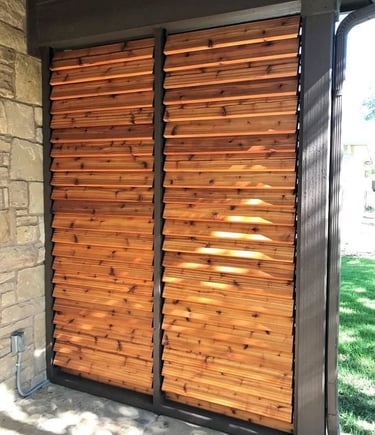

This beautifully crafted privacy screen features wooden slats arranged in a sturdy wooden frame, offering both functionality and aesthetic appeal. It’s a perfect addition to patios, decks, or outdoor spaces, creating privacy while allowing airflow and adding a modern look.
Materials Needed:
Pressure-treated wooden boards for the frame (e.g., 2x4 or 2x6 boards)
Wooden slats (1x4 or 1x6 boards, cedar or pine for durability)
Galvanized screws or nails – for weather resistance
Wood stain or sealant – to protect against weather damage
Spacers – to maintain consistent gaps between slats
Tools Required:
Drill and driver
Circular saw or miter saw
Measuring tape
Level
Sandpaper or sander
Paintbrush or sprayer
Step-by-Step Installation:
1. Build the Wooden Frame
Cut pressure-treated wooden boards to create a sturdy rectangular frame. Ensure the dimensions match your intended space.
Assemble the frame using galvanized screws for strength and weather resistance. Use a level to keep the structure perfectly square.
If the screen will be freestanding, reinforce the bottom of the frame with horizontal supports.
2. Cut and Prepare the Wooden Slats
Measure and cut the wooden slats to fit the width of the frame. Use a miter saw for clean, precise cuts.
Sand all slats to ensure a smooth finish and prevent splinters.
Apply a wood stain or sealant to each slat to protect against moisture and UV damage.
3. Install the Wooden Slats
Start attaching slats from the top of the frame, working downward.
Use spacers to maintain even gaps between each slat for a modern, uniform appearance. Common gaps range from 1/2 inch to 1 inch.
Secure each slat to the vertical frame with galvanized screws. Make sure the screws are flush with the wood surface.
Regularly check alignment with a level to maintain straight lines.
4. Final Assembly and Installation
If the privacy screen will be installed against a wall, secure the frame with brackets or wood screws.
For freestanding screens, anchor the posts into the ground or attach the frame to a solid base for stability.
Inspect the structure for sturdiness, and touch up any areas with additional stain or sealant.
Benefits of a Wooden Privacy Screen:
Stylish Design: Natural wood creates a warm, modern appearance.
Customizable: Adjust slat spacing, wood type, or stain color to fit your style.
Durable: Pressure-treated wood resists rot, insects, and weather damage.
Functional: Provides privacy while maintaining airflow and light.
Looking for a custom privacy screen for your home?
We specialize in woodworking projects, including fences, decks, and privacy screens. Let us create the perfect addition to your outdoor space!
ProHands Handyman
📞 818-401-7766
🌐 www.prohandshandyman.com
Transform your outdoor area into a cozy and private retreat with our professional craftsmanship!