
How to Use a Rafter Square (Speed Square)
A rafter square, often referred to by its trademark name Speed Square, is an essential tool for carpenters and DIY enthusiasts. It allows you to measure and mark perpendicular lines, lay out rafters, and more. Here’s a step-by-step guide on how to use it effectively:
ARTICLESTOOLS
12/31/20241 min read
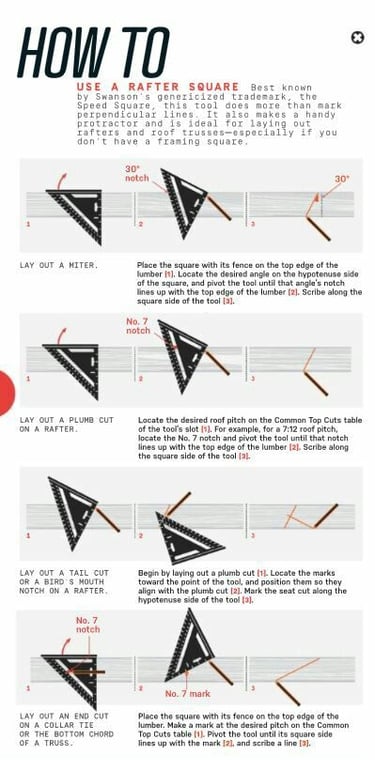
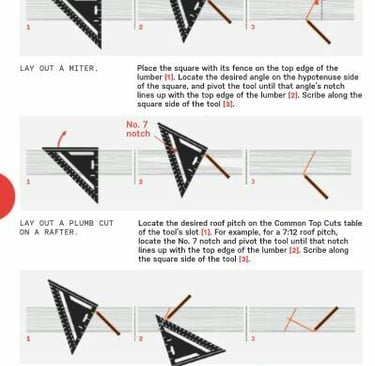
1. Lay Out a Miter
• Place the square with its fence on the top edge of the lumber.
• Locate the desired angle on the hypotenuse side of the square.
• Align the angle mark with the top edge of the lumber and scribe along the square side.
2. Lay Out a Plumb Cut on a Rafter
• Use the “Common Top Cuts” table on the tool to locate the desired roof pitch (e.g., 7:12 pitch).
• Position the square so the notch matches the pitch, aligning it with the top edge of the lumber.
• Scribe along the square side to create your plumb cut line.
3. Lay Out a Tail Cut or Bird’s Mouth Notch
• Begin by laying out a plumb cut.
• Use the markings for the seat cut along the hypotenuse side of the square.
• Position the square to align the notch for the tail cut or bird’s mouth.
4. Lay Out a Collar Cut or End Cut
• Align the square to match the desired pitch from the “Common Top Cuts” table.
• Ensure the fence is flush with the lumber edge.
• Scribe along the square side to create the collar cut.
Pro Tips:
• Durability: Choose a rafter square made of aluminum or steel for longevity.
• Ease of Use: Practice aligning the square and reading the pitch tables for precise cuts.
• Versatility: The Speed Square can double as a protractor or straightedge for various tasks.
Using a rafter square ensures accurate cuts and reduces errors, making it a must-have for framing, roofing, and other carpentry projects. If you’re looking for advice or assistance with your projects, feel free to contact us!
Contact Information:
📞 Phone: 818-401-7766
📧 Email: info@prohandshandyman.com
🌐 Website: www.prohandshandyman.com
Let us help you with your construction and home improvement needs!