
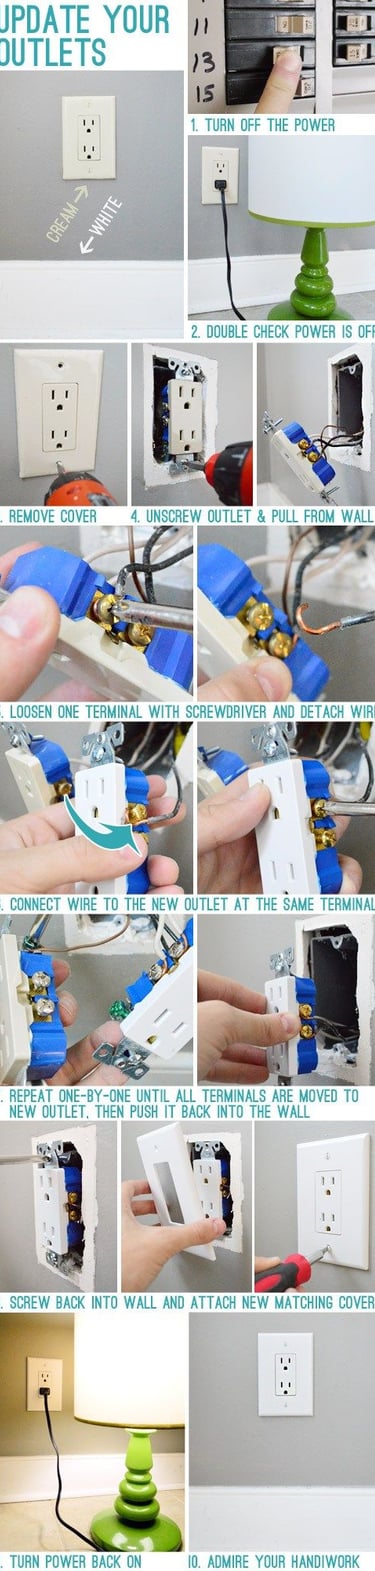
How to Replace an Electrical Outlet in the USA: A Step-by-Step Guide
Replacing an electrical outlet in your home is a simple task that can improve safety and appearance. Follow this step-by-step guide to safely and effectively replace an outlet.
ARTICLES
1/26/20252 min read
Tools and Materials Needed:
Screwdriver (flathead and Phillips)
Voltage tester
New electrical outlet
Electrical tape
Needle-nose pliers
Wire stripper (optional)
Safety First
Before starting, ensure your safety by turning off the power and confirming the circuit is not live.
Turn Off the Power:
Go to your breaker box and switch off the circuit controlling the outlet.
Test the outlet with a voltage tester to confirm it’s deactivated.
Double-Check Power is Off:
Plug in a lamp or a small electrical device to ensure the outlet is dead.
Retest with a voltage tester for added safety.
Step-by-Step Instructions
Step 1: Remove the Outlet Cover
Unscrew and remove the faceplate covering the outlet.
Keep the screws in a safe place to reuse them later.
Step 2: Unscrew and Pull Out the Outlet
Use a screwdriver to loosen the screws holding the outlet to the wall box.
Carefully pull the outlet forward to expose the wiring.
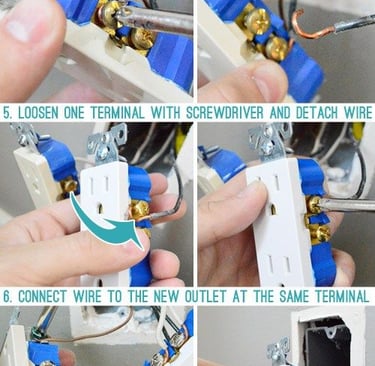
Step 3: Disconnect the Wires
Loosen the screws on the outlet terminals using your screwdriver.
Remove the wires (black, white, and green or bare copper).
Black wire: Hot
White wire: Neutral
Green/Bare wire: Ground
Step 4: Prepare the New Outlet
Inspect the new outlet to identify the terminal locations:
Gold screws: Hot wires
Silver screws: Neutral wires
Green screw: Ground wire
Strip the wire ends (if needed) to expose about 1/2 inch of copper for a proper connection.
Step 5: Connect the Wires
Attach each wire to the corresponding terminal:
Loop the bare wire clockwise around the terminal screw.
Tighten the screw to secure the wire firmly.
Use electrical tape to cover the terminals for added safety.
Step 6: Secure the Outlet Back into the Wall
Gently push the outlet back into the electrical box.
Ensure all wires are neatly tucked inside and there’s no pressure on the connections.
Screw the outlet into place.
Step 7: Attach the Faceplate
Place the faceplate over the outlet and secure it with screws.
Ensure the faceplate sits flush against the wall.
Final Steps
Restore Power:
Go back to the breaker box and turn the power back on.
Test the outlet with a lamp or device to ensure it’s functioning properly.
Inspect Your Work:
Ensure the outlet is securely attached and the faceplate is properly aligned.
Admire Your Handiwork:
Congratulate yourself on a job well done!
Important Notes:
Always adhere to local electrical codes and regulations.
If you’re unsure about handling electrical wiring, consult a licensed electrician.
Use GFCI outlets in areas near water, such as bathrooms, kitchens, and outdoor spaces.
For more professional tips and home repair solutions, contact ProHands Handyman Services: 📞 818-401-7766