How to Install Cement Board for Tile Projects
Cement board is the preferred underlayment for tile installations in wet areas like bathrooms and kitchens. It provides a solid, water-resistant base for tile and prevents mold and moisture damage. Here’s a detailed guide on how to install cement board like a pro.
ARTICLES
2/25/20252 min read


1. Why Use Cement Board?
Moisture Resistance: Cement board is water-resistant, preventing mold and mildew growth. It’s ideal for showers, tub surrounds, and backsplash areas.
Durability: It provides a sturdy base, preventing tile cracks and grout failure due to movement or moisture.
Adhesion: Cement board offers excellent adhesion for tile mortar, ensuring a long-lasting installation.
2. Materials and Tools Needed
Materials:
Cement board (e.g., HardieBacker or Durock)
Cement board screws (corrosion-resistant)
4-mil plastic sheeting (moisture barrier)
Fiberglass mesh tape (alkali-resistant)
Thin-set mortar (modified for better adhesion)
Tools:
Utility knife or carbide-tipped scoring tool
Drill with a screwdriver bit
Tape measure and level
Notched trowel
Sponge and bucket
3. Preparing the Surface
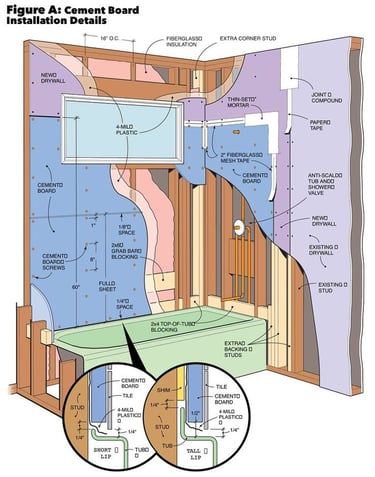
Remove Existing Drywall or Plaster: Remove any old drywall or plaster from the area where the cement board will be installed.
Check Wall Studs: Ensure that wall studs are 16 inches on center (O.C.) and are level and plumb. Install additional blocking if necessary for support.
Install Moisture Barrier: Staple 4-mil plastic sheeting to the studs to act as a moisture barrier. Overlap seams by at least 2 inches.
4. Cutting and Installing Cement Board
Measure and Cut: Measure the wall area and cut the cement board to fit. Use a utility knife or carbide-tipped scoring tool to score and snap the board.
Leave a Gap: Leave a 1/8-inch gap between sheets and a 1/4-inch gap at the floor and tub or shower base to allow for expansion.
Attach to Studs: Secure the cement board to the studs using cement board screws, placing screws every 8 inches along the studs.
Stagger Seams: Stagger the seams so they don’t align with the seams of the drywall above or below for added strength.
5. Sealing the Joints
Apply Mesh Tape: Place fiberglass mesh tape over the seams between boards.
Thin-Set Mortar: Apply a layer of thin-set mortar over the mesh tape using a notched trowel, smoothing it out to create a seamless surface.
Let it Cure: Allow the mortar to cure according to the manufacturer’s instructions before tiling.
6. Ready for Tiling
Once the cement board is installed and the joints are sealed:
Check for Smoothness: Ensure all seams and screw heads are covered and the surface is smooth and even.
Start Tiling: Begin your tile installation using thin-set mortar and the appropriate notched trowel for your tile size.
Need Professional Help?
Installing cement board is a crucial step for a durable and water-resistant tile installation. If you want a flawless finish without the hassle, contact ProHands Handyman. We provide expert cement board installation and tile services to transform your space.
📞 Call or text: 818-401-7766
📍 Serving Glendale, Burbank, Pasadena, and surrounding areas.
Contact us today for a free estimate and professional installation!
