
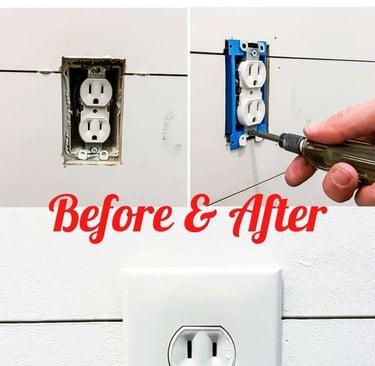
How to Install an Outlet Extender
Outlet extenders, also known as box extenders, are used when an electrical outlet is recessed too far into the wall, often after adding new wall coverings like tile, paneling, or wainscoting. Installing an outlet extender is a simple solution to bring the outlet flush with the wall surface for safety and aesthetics. Here’s how to do it safely and efficiently.
ARTICLES
2/28/20251 min read

1. Why Install an Outlet Extender?
Safety: Outlets that sit too far back can be a fire hazard due to exposed wires. An extender ensures the outlet is securely mounted and reduces the risk of short circuits.
Compliance: Many electrical codes require outlets to be flush with the wall surface for safety reasons.
Appearance: An extender creates a cleaner and more professional finish, hiding gaps between the outlet and wall plate.
2. Tools and Materials Needed
Tools:
Voltage tester
Screwdriver
Utility knife
Materials:
Outlet extender (box extender)
Longer outlet screws (if needed)
Wall plate (optional, for a cleaner finish)
3. Turn Off the Power
Safety First: Turn off the power to the outlet at the circuit breaker.
Test for Power: Use a voltage tester to double-check that the power is off before touching any wires.
4. Remove the Outlet Cover and Outlet
Remove the Wall Plate: Unscrew and remove the wall plate covering the outlet.
Unscrew the Outlet: Carefully unscrew the outlet from the electrical box but don’t disconnect the wires.
Check Wire Connections: Inspect the wires to ensure they are securely connected and in good condition.
5. Install the Outlet Extender
Choose the Right Extender: Measure the depth needed to bring the outlet flush with the wall surface and select the correct size extender.
Place the Extender: Slide the outlet extender over the outlet and into the electrical box, ensuring a snug fit.
Secure the Outlet: Align the outlet with the extender and secure it with longer screws if necessary.
6. Reassemble and Test
Attach the Wall Plate: Screw the wall plate back on, ensuring it sits flush against the wall.
Restore Power: Turn the power back on at the circuit breaker.
Test the Outlet: Use the voltage tester to confirm that the outlet is functioning correctly.
Need Professional Help?
Working with electricity can be dangerous if not done correctly. If you’re unsure or want a professional finish, contact ProHands Handyman. We provide expert electrical services to ensure your home is safe and compliant with electrical codes.
📞 Call or text: 818-401-7766
📍 Serving Glendale, Burbank, Pasadena, and surrounding areas.
Contact us today for a free estimate and safe installation!