How to Install an Exterior Light Fixture
Installing an exterior light fixture not only enhances your home’s curb appeal but also provides security and functionality. Whether you’re upgrading an old fixture or installing a new one, proper installation ensures durability and safety. Follow this step-by-step guide to install an exterior light fixture like a pro.
ARTICLES
3/3/20252 min read

1. Tools and Materials Needed
Tools:
Screwdriver
Drill and drill bits
Voltage tester
Wire strippers
Caulk gun
Utility knife
Materials:
Exterior-rated light fixture (sconce, lantern, etc.)
Weatherproof mounting block
Electrical box (if one isn’t already installed)
Outdoor-rated caulk
Builder’s felt (for waterproofing)
Drip edge (optional, for extra protection)
2. Turn Off the Power
Locate the Circuit Breaker: Switch off the power to the existing outdoor light fixture at the circuit breaker.
Use a Voltage Tester: Double-check that no power is flowing to the wires before proceeding.
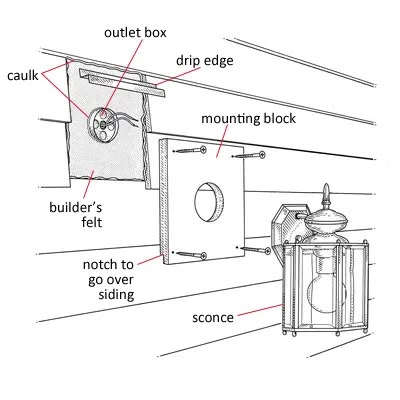
3. Prepare the Mounting Area
Remove the Old Fixture (if applicable): Unscrew the existing light fixture and disconnect the wiring.
Install a Weatherproof Outlet Box: If there’s no existing electrical box, install an outdoor-rated junction box.
Apply Builder’s Felt: Staple builder’s felt around the electrical box to create a moisture barrier.
Attach a Drip Edge: Install a drip edge above the fixture location to divert water away from the fixture.
4. Install the Mounting Block
Cut a Notch for Siding: If your home has siding, cut a notch in the mounting block to fit securely over the siding.
Secure the Mounting Block: Attach the mounting block over the outlet box using screws.
Apply Caulk: Seal around the edges of the mounting block with weatherproof caulk to prevent water intrusion.
5. Wiring the Light Fixture
Connect the Wires:
Black Wire (Hot) to Black Wire from the fixture.
White Wire (Neutral) to White Wire.
Green or Bare Copper Wire (Ground) to the Ground Wire or Electrical Box.
Secure with Wire Nuts: Twist the wires together and secure them with wire nuts, ensuring a tight connection.
Tuck Wires Inside the Box: Carefully push the wires into the electrical box to avoid pinching.
6. Attach the Light Fixture
Align the Fixture: Position the light fixture over the mounting block and secure it with screws.
Seal Around the Fixture: Apply a bead of outdoor-rated caulk around the fixture base to keep out moisture.
Install the Light Bulb and Cover: Screw in an outdoor-rated bulb and attach any glass covers or decorative elements.
7. Restore Power and Test
Turn On the Breaker: Restore power at the circuit breaker.
Test the Light: Flip the switch to ensure the fixture works properly.
Adjust as Needed: If the light flickers or doesn’t turn on, double-check wiring connections and secure fittings.
Need Professional Installation?
Installing an exterior light fixture requires precision and safety measures. If you need expert help, contact ProHands Handyman. We provide reliable exterior lighting installation services to enhance your home’s safety and curb appeal.
📞 Call or text: 818-401-7766
📍 Serving Glendale, Burbank, Pasadena, and surrounding areas.
Contact us today for a free estimate and professional installation!