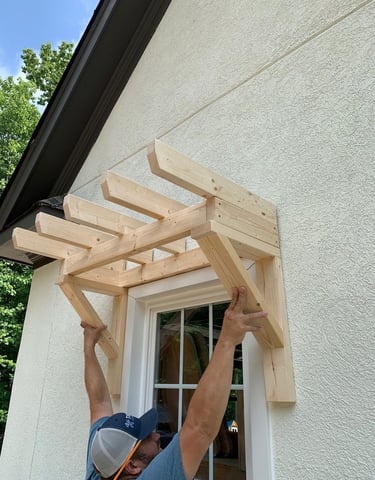
How to Build and Install a Wooden Window Pergola
Adding a wooden pergola over a window not only enhances the visual appeal of your home but also provides functional shade. Follow this step-by-step guide to construct and install your own window pergola.
ARTICLES
1/28/20252 min read


Materials and Tools Needed
Materials:
Pressure-treated wood (2x4s, 2x6s, or 2x8s, depending on design)
Exterior-grade wood screws
Metal brackets or joist hangers
Wood glue
Exterior wood stain or paint
Anchors (concrete or drywall, depending on wall type)
Tools:
Measuring tape
Circular saw or miter saw
Drill and drill bits
Level
Screwdriver
Sandpaper or power sander
Ladder
Safety goggles and gloves
Step 1: Design Your Pergola
Measure the width of the window and decide how far the pergola will extend on each side (usually 6–12 inches).
Choose the depth (projection) of the pergola, typically 18–24 inches.
Sketch a basic plan, including:
Horizontal beams: These will be attached to the wall.
Vertical supports: Diagonal or straight braces for stability.
Cross slats: For the top of the pergola.
Step 2: Prepare the Materials
Cut the wood:
Horizontal beams: Two pieces matching the width of the pergola.
Cross slats: Multiple pieces cut to the desired depth.
Vertical supports or brackets: Two pieces angled or straight.
Sand the wood to smooth any rough edges.
Stain or paint all pieces with an exterior-grade finish and let them dry completely.
Step 3: Attach the Horizontal Beams
Mark the wall:
Measure and mark the desired height of the pergola above the window.
Ensure the marks are level.
Drill pilot holes into the wall at the marked locations.
Secure the first horizontal beam using anchors appropriate for your wall type.
Repeat for the second beam, ensuring they are parallel and level.
Step 4: Install Vertical Supports
Attach the vertical supports or brackets to the ends of the horizontal beams using wood screws and wood glue for extra stability.
Use a level to ensure the supports are perpendicular to the wall.
Step 5: Add Cross Slats
Place the cross slats evenly spaced across the horizontal beams (recommended spacing: 6–12 inches apart).
Secure each slat using wood screws or brackets.
Ensure all slats are parallel and level.
Step 6: Final Touches
Fill any visible screw holes with wood filler and sand smooth.
Apply a second coat of paint or stain, focusing on areas exposed to the elements.
Inspect for stability by gently shaking the pergola.
Maintenance Tips
Inspect the pergola annually for signs of wear, such as loose screws or peeling paint.
Reapply wood stain or paint every 2–3 years to maintain its appearance and durability.
Clear debris such as leaves from the cross slats regularly to avoid water damage.
Installing a window pergola is an excellent way to add character to your home. For professional assistance or to discuss custom designs, reach out to us today!
Contact Us Phone: 818-401-7766
Hours: 8 AM - 6 PM, Daily
Let’s make your home even more beautiful!
