How to Build a DIY Children’s Kitchen: A Step-by-Step Guide
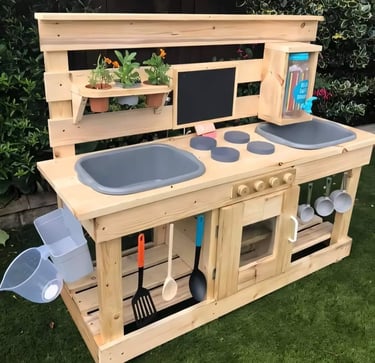
Creating a DIY children’s kitchen is a fun, rewarding, and budget-friendly project that sparks your child’s creativity and imaginative play. Here’s how you can craft a personalized play kitchen using wood, simple tools, and accessories.
ARTICLES
1/17/20252 min read


Materials Needed:
1. Wood: Plywood, pallet wood, or leftover timber pieces.
2. Screws and nails: For assembly.
3. Paint: Non-toxic and child-safe.
4. Plastic bowls: For sink basins.
5. Knobs: Repurposed from old furniture for the stove and oven.
6. Acrylic sheet or glass: For the oven door.
7. Hooks: To hang utensils and other kitchen accessories.
8. Accessories: Toy kitchen tools, pots, and pans.
9. Chalkboard paint (optional): For a writable surface.
Tools Required:
• Drill and screwdriver
• Saw (hand or electric)
• Measuring tape
• Sandpaper
• Paintbrushes
Step-by-Step Instructions:
1. Plan and Measure the Structure
• Design: Sketch a rough design of the kitchen. Include compartments for a stove, sink, oven, and shelves.
• Measure: Ensure the structure’s height and dimensions are appropriate for your child’s age.
2. Cut and Prepare the Wood
• Cut: Use a saw to cut the wood into panels for the kitchen’s base, backboard, and sides.
• Sand: Smooth the edges with sandpaper to prevent splinters.
3. Assemble the Frame
• Assemble the main frame using screws and nails.
• Attach the backboard securely to provide support for hooks and shelves.
4. Install the Sink
• Cut a circular or rectangular hole in the countertop.
• Place a plastic bowl in the hole to act as the sink.
• Secure the bowl with glue or screws.
5. Create the Stove and Oven
• Stove: Paint the stovetop area black. Attach round wooden discs or painted circles for burners.
• Oven: Create a hinged door using a wood panel and install a small acrylic or glass sheet for a realistic window.
6. Add Shelves and Storage
• Add small shelves above the sink for plants or toy jars.
• Build storage space below the sink and oven for pots, pans, and other accessories.
7. Attach Accessories
• Install hooks on the backboard to hang utensils and cups.
• Attach knobs for the stove and oven. Use old furniture knobs or repurpose small round objects.
8. Paint and Decorate
• Use non-toxic paint to brighten the kitchen. Choose colors your child loves.
• Add chalkboard paint on one section for a writable menu or notes area.
9. Add Final Touches
• Place toy plants, jars, or utensils on shelves.
• Ensure everything is securely fastened and child-safe.
Benefits of a DIY Children’s Kitchen
1. Imagination and Creativity: Encourages pretend play.
2. Fine Motor Skills: Handling utensils and knobs improves coordination.
3. Customization: Tailored to your child’s preferences.
4. Sustainability: Repurpose old materials to reduce waste.
By building a DIY children’s kitchen, you create not only a play area but also cherished memories of a personalized project for your child. Get creative and let the fun begin!
If you have any questions or want to order a custom kids’ kitchen or other projects, feel free to contact me:
• ProHands Handyman Services
• Phone: +1 (818) 401-7766
• Email: info@prohandshandyman.com
• Website: www.prohandshandyman.com
We specialize in custom projects for your home and family.
