
How to Build a Children’s Playhouse With Your Own Hands
A Simple DIY Project for Parents and Enthusiasts
ARTICLES
12/16/20242 min read

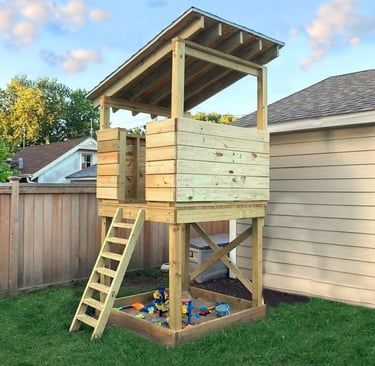
If you've ever dreamed of building a charming playhouse for your kids, this project is perfect! This elevated wooden playhouse with a sandbox underneath is a simple and practical DIY project. It combines play space, shade, and fun into one durable structure. Here's a step-by-step guide to building it yourself!
Overview of the Project
This wooden playhouse includes:
Elevated Platform: Provides a great play space for kids.
Sandbox Base: Doubles as a shaded area for playing with sand.
Roof: A sturdy slanted roof to keep the area dry and shaded.
Ladder: Easy access for climbing into the playhouse.
Estimated Materials Cost
Wood: $200–$300 (Pressure-treated lumber recommended for outdoor durability)
Roofing Materials: $50–$100 (Corrugated metal or shingles)
Screws, Nails, and Hardware: $20–$40
Sand for Sandbox: $50–$100
Tools: Common tools like a drill, saw, measuring tape, and hammer
Materials List
Wood Planks:
4x4 posts for structural support (approx. 8 pieces)
2x4 planks for framing
1x6 boards for wall panels and flooring
Plywood Sheets for roofing (if using shingles)
Roofing Material: Corrugated steel, shingles, or roofing panels
Screws and Bolts for securing the frame
Sand for the base sandbox
Paint or Stain for protection
Step-by-Step Instructions
1. Prepare the Site
Choose a flat area in your backyard.
Clear grass or debris and level the ground.
2. Build the Frame
Start with the sandbox base:
Use 4x4 posts to create corner supports.
Connect the posts with 2x4 planks to form a square frame.
Add diagonal cross braces for stability.
Build a deck floor using 1x6 boards laid across the base.
3. Construct the Platform
Extend the 4x4 posts upward to support the platform.
Frame the flooring area (approx. 6x6 feet) using 2x4 planks.
Secure the deck planks on top.
4. Add Walls and Railings
Install vertical 1x6 boards around three sides of the platform.
Leave space for the entrance and ladder.
Add horizontal railings for safety.
5. Build the Roof
Create a slanted frame for the roof:
Use 2x4 planks to form rafters.
Cover with plywood or corrugated roofing panels.
Secure the roof with screws to ensure weather protection.
6. Install the Ladder
Build a simple ladder using 2x4 planks:
Cut steps and attach them evenly to two side planks.
Secure the ladder at a slight angle for stability.
7. Fill the Sandbox
Add play sand to the bottom area.
Smooth it out evenly for a fun play surface.
8. Paint or Stain
Finish the wood with an outdoor stain or paint to protect it from weather damage.
Let it dry completely before use.
Tips for Success
Safety First: Sand down rough edges to prevent splinters.
Weatherproofing: Use pressure-treated wood and weather-resistant screws.
Customization: Add a slide, climbing ropes, or decorative elements like flowers for extra fun!
Conclusion
This DIY wooden playhouse with a sandbox is a rewarding project that will provide your kids with endless hours of fun. It’s practical, budget-friendly, and adds charm to your backyard. If you’d like professional help or need advice on materials, don’t hesitate to contact us!
Contact Us for Professional Services:
ProHands Handyman
Phone: 818-401-7766
Website: www.prohandshandyman.com
Service Area: Glendale, Burbank, Pasadena, and nearby areas
Let us help you turn your ideas into reality!