Guide to Installing a Shower Faucet System: Key Components and Assembly Process
Properly installing a shower faucet system is essential for ensuring efficient water flow and long-lasting functionality. Below, we break down the main components of a shower faucet system and provide step-by-step guidance for installation.
ARTICLES
1/25/20252 min read

Components Overview
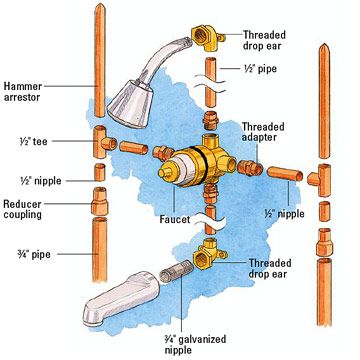
Threaded Drop Ear: This fitting secures pipes to the wall and ensures a stable connection for the faucet and shower head.
Hammer Arrestor: Prevents water hammer noise and protects the pipes from damage due to sudden pressure changes.
½-inch Tee: Connects the water supply to the faucet and shower head.
Reducer Coupling: Adjusts pipe sizes where necessary.
Nipples (½-inch and ¾-inch): Short lengths of pipe that join the fittings together.
Threaded Adapter: Links different types of pipes, such as copper to threaded fittings.
Faucet: The main control point for regulating water flow and temperature.
Shower Head: Dispenses water for showering.
Galvanized Nipple (¾-inch): Used for connecting larger sections to the faucet or tub spout.
Installation Steps
Step 1: Prepare the Workspace
Shut off the water supply.
Remove any existing fixtures or pipes carefully to avoid damaging surrounding walls or flooring.
Inspect the wall cavity for any signs of damage or corrosion.
Step 2: Assemble the Components
Install the Threaded Drop Ear:
Attach the threaded drop ear fittings securely to the studs or wall framing. Ensure they are level and at the appropriate height for the shower head and tub spout.
Attach the Hammer Arrestor:
Connect the hammer arrestor above the tee fitting leading to the shower head. This device reduces pressure surges and prevents noise.
Connect the ½-inch Tee:
Use the ½-inch tee to split the water supply between the faucet and the shower head. Ensure the connections are tightened properly with Teflon tape to prevent leaks.
Install the Nipples and Reducer Coupling:
Thread the ½-inch and ¾-inch nipples as needed to connect the fittings. Add the reducer coupling where the pipe size changes.
Threaded Adapter Installation:
Use the threaded adapter to join copper pipes with threaded fittings, ensuring a tight, leak-proof seal.
Step 3: Attach the Faucet and Shower Head
Faucet Installation:
Align the faucet with the threaded drop ear and secure it firmly. Make sure the hot and cold water lines are connected to the correct sides.
Shower Head Connection:
Attach the shower head to the top outlet using a threaded nipple. Apply Teflon tape around the threads for a watertight connection.
Tub Spout Installation:
Screw the ¾-inch galvanized nipple into the bottom outlet and attach the tub spout. Ensure the spout is level and aligned properly.
Step 4: Test the System
Turn on the water supply and test each connection for leaks.
Check the water flow from the shower head and tub spout.
Ensure proper temperature control through the faucet.
Tips for a Successful Installation
Use Quality Materials: Invest in durable fittings and pipes to reduce the risk of leaks and frequent repairs.
Apply Teflon Tape: Always use Teflon tape on threaded connections to prevent leaks.
Secure Fixtures: Ensure all fittings are firmly secured to the wall studs to avoid movement and wear over time.
Inspect Before Sealing: Before closing up walls, double-check for leaks and functionality.
Troubleshooting Common Issues
Simultaneous Water Flow to Shower and Tub:
Adjust or replace the diverter valve in the faucet.
Ensure the faucet cartridge is installed correctly.
Low Water Pressure:
Check for blockages in the pipes or shower head.
Inspect the water supply valves to ensure they are fully open.
Leaks Around Fittings:
Tighten connections and reapply Teflon tape where necessary.
Proper installation of bathtub and shower plumbing can save time, money, and future headaches. By following these steps and using high-quality components, you can ensure a reliable and efficient plumbing system for your home.
For expert assistance or further inquiries, contact us at ProHands Handyman Services. We’re here to help!