
10 Types of Hammers and Their Uses: A Comprehensive Guide
Hammers are essential tools, whether you’re a professional contractor or a DIY enthusiast. Selecting the right hammer not only improves efficiency but also ensures the safety and quality of your work. Let’s dive into the detailed breakdown of 10 common types of hammers, their features, and how to use them effectively.
ARTICLESTOOLS
1/22/20253 min read
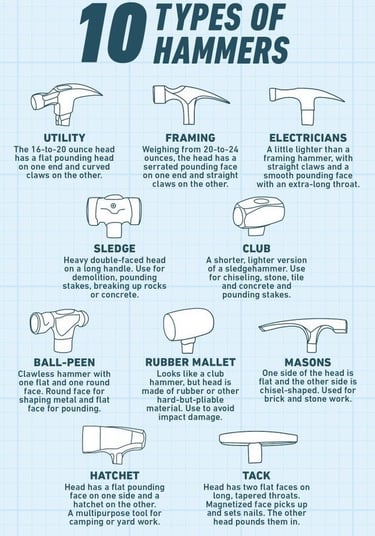

1. Utility Hammer (General-Purpose Hammer)
• Features: Weighing 16-20 ounces, this hammer has a flat surface for driving nails and curved claws for pulling them out.
• Materials: Often made of steel with a rubber-coated handle for a firm grip.
• Best For: Everyday household repairs, such as fixing furniture, assembling small projects, or hanging pictures.
• Tips for Use: Choose this hammer if you’re performing light to moderate tasks. Its lightweight design is ideal for prolonged use.
2. Framing Hammer
• Features: A larger and heavier tool (20-24 ounces) with straight claws for prying wood apart and a serrated face for better nail grip.
• Materials: Typically made of heavy-duty steel with a long, ergonomic handle to deliver more striking power.
• Best For: Building wooden frames, heavy construction projects, and jobs requiring long nails.
• Tips for Use: Use with caution as the heavier weight requires proper handling to avoid injury.
3. Electrician’s Hammer
• Features: Lighter than a framing hammer with a longer throat for reaching into tight spaces.
• Design: Features smooth surfaces to avoid damaging delicate electrical components.
• Best For: Installing electrical panels, attaching conduit, and working in confined areas.
• Tips for Use: This hammer is perfect for precision tasks. Pair it with insulated tools when working near live wires.
4. Sledgehammer
• Features: Equipped with a heavy, double-faced head and a long handle for maximum leverage.
• Weight: Typically 8-20 pounds, depending on the model.
• Best For: Breaking concrete, driving stakes into the ground, and demolishing structures.
• Tips for Use: Always wear safety goggles and gloves when using a sledgehammer. Use your body weight to control the swing rather than relying on your arms.
5. Club Hammer
• Features: A smaller version of the sledgehammer with a compact handle and double-faced head.
• Weight: Usually around 2-4 pounds.
• Best For: Light demolition tasks, driving chisels into stone or brick, and general construction work.
• Tips for Use: Ideal for tasks requiring controlled force in smaller spaces.
6. Ball-Peen Hammer
• Features: One side has a rounded surface, while the other side is flat for striking.
• Commonly Used In: Metalworking, riveting, and shaping steel or sheet metal.
• Best For: Shaping and peening (hardening) metal, as well as general maintenance tasks in workshops.
• Tips for Use: Use the rounded side to smooth out metal edges or create curves.
7. Rubber Mallet
• Features: A head made of soft rubber or polyurethane to avoid damaging surfaces.
• Best For: Furniture assembly, tile work, and aligning delicate materials.
• Tips for Use: Great for precision work where minimal impact is required. Always keep the mallet clean to prevent transferring dirt to surfaces.
8. Mason’s Hammer
• Features: One flat face for driving nails and a chisel-shaped edge for cutting and shaping stone or brick.
• Best For: Masonry tasks, such as splitting bricks or carving stones.
• Tips for Use: When splitting bricks, strike firmly but evenly along the chiseled edge for a clean break.
9. Hatchet Hammer
• Features: A hybrid tool with a hammer face on one side and a hatchet blade on the other.
• Best For: Splitting small wood pieces, yard work, and camping.
• Tips for Use: Keep the blade sharp and use the hammer side for driving stakes or nails.
10. Tack Hammer
• Features: A lightweight hammer with magnetic tips to hold small nails (tacks) in place.
• Best For: Upholstery work, tacking fabric to furniture, and delicate woodworking.
• Tips for Use: Ideal for precision tasks where small nails need to be set without damage.
How to Choose the Right Hammer
1. Identify the Task: Match the hammer type to your specific project needs.
• Heavy-duty construction? Go for a framing or sledgehammer.
• Fine, detailed work? Consider a rubber mallet or tack hammer.
2. Material Compatibility: Ensure the hammer is suitable for the material you’re working with.
3. Ergonomics: Look for hammers with comfortable, anti-slip handles for prolonged use.
Safety Tips
• Always wear protective gloves and goggles.
• Inspect your hammer for damage before each use.
• Use a hammer designed for the specific task to avoid accidents or material damage.
Conclusion
Each hammer serves a distinct purpose, making it easier to complete tasks efficiently and safely. Whether you’re framing a house, assembling furniture, or tackling a DIY project, the right hammer can make all the difference.
Need professional help for your projects? Contact ProHands Handyman for expert assistance in Glendale, Burbank, Pasadena, and nearby areas.
📞 Call us at: 818-401-7766
🌐 Visit our website: www.prohandshandyman.com